Pavlova with Dark Chocolate, Hazelnuts, Passion Fruit and Raspberries

So as it turns out, I’m actually terrible at blogging…

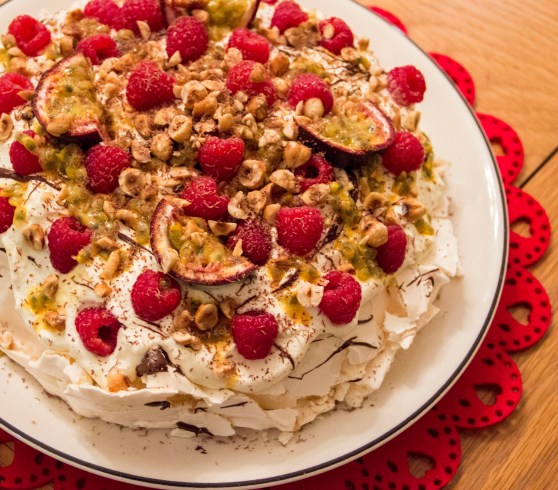
I swear I’ll try and be better. I made this pavlova back in December of 2016 (I know…). I had never made a pavlova before as, although they tasted great the thoughts of actually making one never really excited me. I tend to steer more towards chocolate when it comes to desserts. I persevered, and since you can pretty much do anything with the toppings I thought I’d mix it up a bit!

1.133

I’ll be honest. It’s almost a year ago since I actually made this so I’m not entirely sure if the recipe I have written down is the one I used in the end! But… this combination of toppings was pretty fantastic so I felt the need to share it with the world – shout it from the rooftops if you will.

1.129

I had just bought some passion fruit curd at the Craft Fair in the RDS and was very excited to use it. As it turns out, I didn’t end up using the curd in this at all… But it gave me the inspiration I needed to make this!

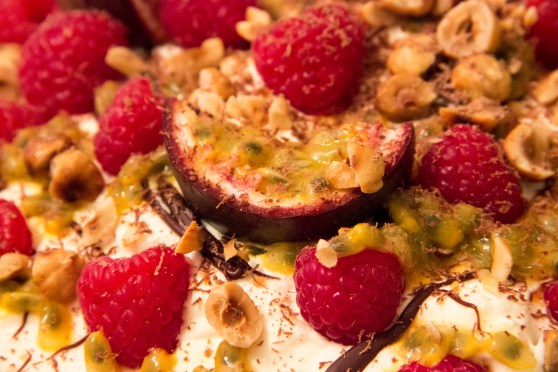
Passion fruit is one of my favourite fruits/foods in general, and throw that together with a few other great foods and things get interesting! Some people might say nuts and chocolate don’t have a place on a pavlova, but give this a try and I might change your mind!

For the meringue:
6 egg whites
270g caster sugar
2 tsp cornflour
1 tsp white vinegar
1/2 tsp vanilla extract

For the topping:
300ml fresh cream
50g dark chocolate (melted)
3 to 4 passion fruits
200g raspberries
100g hazelnuts (toasted)
A few squares of chocolate to grate over the top

The quantity of toppings doesn’t need to be precise, just throw on whatever looks about right. Although in this case I don’t think less is more. Pile it on!

Directions:
Preheat the oven to 120°C.

Line a tray with baking parchment. Mark a 24cm (ish) circle in pencil on the underside of the paper as a guide.

Separate your eggs and beat the whites in stand mixer (Kitchen Aid’s are a godsend for this. You can still use a hand mixer but it’ll just take a bit longer!). Whip until stiff peaks form and then start adding the sugar a spoon at a time.

Beat well until thick and glossy.

Spoon onto the lined tray and level off the top so the toppings will sit nicely on top (I on the other hand did not do this…).

Place into the oven for about an hour and a half, or until dry to the touch.

Turn off the oven and leave the pavlova to cool inside with the door slightly propped open.
This should dry it out a bit so it has that nice crispy shell. I made mine on the same day of baking but I read somewhere that leaving it overnight provides great results so I’ll try that next time!

So now it’s time for toppings!

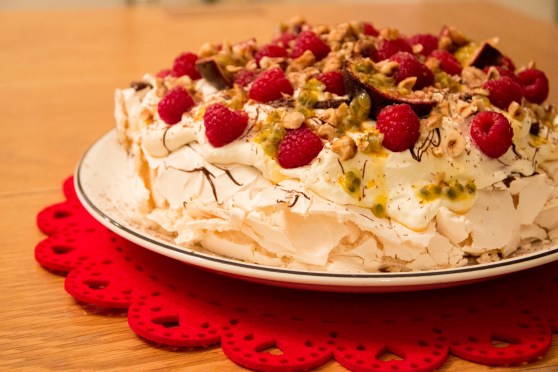
Melt your dark chocolate and drizzle over the pavlova. This will be covered by the cream so it doesn’t really matter if it’s messy. Let this harden a bit before adding the cream.

Beat the cream and layer generously over the top.

Scoop your passion fruit over the top – I also liked to add a full passion fruit cut up on top for decoration.

Scatter the raspberries evenly over the top.

Toast the hazelnuts for a few minutes in the oven or over a pan until fragrant and sightly browned. Crush them up a bit with a rolling pin.

Add to the pavlova et voilà!

1.127

Demolish!

Advertisement

Chocolate Pecan Pie

So! I’m back! I’m finished my masters (which involved plenty of procrastination on my part) and I finally have more time to devote to baking! My friend Lisa over at Mettle Magazine asked me to bake something with an autumn themed for them (which was definitely the kick I needed to get back to blogging). Bear in mind, this was posted in October over there, I’m just a bit behind on posting it up here too.

All I could think of was pumpkin related desserts. Don’t hate me, but I’m just not that excited by them. I mean, they’re fine (it’s still dessert after all) but I’d rather carve a pumpkin than eat one.
Instead of going with some sort of Halloween inspired baking, I decided it’s the season to eat everything, so why not make something rich and decadent. Bikini season is over so it’s time to stop kidding yourself and gorge on all the cake or in this case, pie (not that summer stopped any of us doing that before).

I tried this pie years ago in Avoca and fell in love. So I was very excited when I stumbled upon this recipe this recipe. The only thing that might make it better would be some salted caramel sauce. Drool.

1-118
A slice (or seven) of warm gooey chocolate pecan pie, a mug of tea and series to binge watch, all accompanied with a pile of comfy blankets sounds like the perfect way to spend a cold evening indoors. Seriously though, don’t eat seven slices in one sitting… Although I’m not one to judge if it’s done so over the course of one day, let’s say.

For the Pastry:
225g flour
130g butter
2 egg yolks
Cold Water

For the Filling:
225g dark chocolate
115g butter
115g caster sugar
115g brown sugar
115g flour
140g pecans
2 eggs
1 tsp vanilla essence

1-1121-121
Directions:
Begin by making the pastry. Rub the butter into the flour until it resembles breadcrumbs.

Stir in the caster sugar. Then add the egg yolks and a bit of cold water to combine into a dough.

Wrap in cling film and leave the dough to cool in the fridge for about 30 minutes.

While waiting for the pastry to chill, you can start making the filling to speed things up. Preheat the oven to 160°C.

Chop up half of the chocolate (using chocolate chips would have helped with this step) and also chop the pecans. Mix these with both sugars and the flour.

Melt the butter and the other half of the chocolate together, and mix this into the dry ingredients.

Add in eggs and the vanilla to the mixture.

Take the dough out of the fridge now and roll it out on a floured surface. I just greased my tin without lining it and it worked fine, so I’m leaving it up to you to decide.

Place the dough in a round tin, about 25-30cm. A loose-bottomed tin would be easier but it’s not essential (I couldn’t find one).

Pour the filling into the pastry case and bake in the oven for about 40 minutes.

There may be still a slight wobble in the middle. Leave to cool for a few minutes and then dive in head first. It’s recommended you dive in with some vanilla ice cream on hand.

1-126
Embrace your inner pig by shovelling pie in your face.

Pistachio Macarons (To be revisited)

Wow… my last post was in 2014. Now that’s some serious procrastination. I’ve been procrasti-baking of course, but haven’t got around to taking photos or posting anything on this. This blog post was meant to be about gingerbread men that I made in December 2015… but let’s just say it’s a bit far gone and I’ve forgot the recipe!

(Ok… So, I wrote that previous paragraph about a year ago… I’m a disgrace!)

1.94
I’ll admit I’m quite an amateur when it comes to making macarons but I’m determined to eventually perfect them. Now when I made these about a year ago (oops…) they worked out quite well. I even think I still have some of the buttercream in the freezer… which I now realise I should really throw out.

According to my draft from last year, the recipe I used is from The Extraordinary Art of Cake. But… I have a vague recollection that I used a different buttercream recipe. I figured despite my forgetfulness and procrastination, I’d post the photos I took at the time and come back to this later!

1.101    1.97
To be continued…

Oat & Raisin Cookies

If I’m making cookies, usually the decision whether to add chocolate or not is not even questioned. In this case however, it really isn’t needed. (I know – blasphemy!)

These are seriously addictive; you can’t just have one. Go on, I dare you.

1.86

Ingredients:
170g butter
100g brown sugar (demerara or light brown sugar)
100g caster sugar
1 large egg
2 tsp vanilla
220g self-raising flour (I used GF)
½ tsp baking soda
½ tsp cinnamon
½ tsp ground mixed spice
¼ tsp nutmeg
250g oats
100g raisins
30g desiccated coconut

This recipe was a bit of an experiment of adding a bit of everything. If in doubt, I tend to put coconut in everything. I’m sure adding chocolate, nuts or anything else would work too.

1.83
Directions:
Preheat the oven to 180°C and line baking sheets with parchment paper.

Cream the butter with both sugars. Whisk in eggs and vanilla.

Sieve in the flour, baking soda, cinnamon, ground mixed spice and nutmeg. Whisk until incorporated.

Beat in the oats, then add the raisins and coconut. (I’m sure you could try adding in anything else here: chocolate, cranberries, nuts, etc.)

Shape the cookies and flatten slightly. I’d say I used about a tablespoon of the mixture per cookie… probably more. Use your best judgement.

Put them in the oven for about 10-15 mins. They will be pretty soft when you take them out so you have to leave them to cool for about 10 minutes before trying to take them off the parchment. I was impatient and tried to take one off immediately. I thought my experimental recipe had gone horribly wrong but they sorted themselves out after a few minutes.

1.78
Got milk?

Toblerone Cheesecake

Yay cheesecake!

1.36

Right – so I actually made this cheesecake about 4 weeks ago. I know. I’m a disgrace. I’ve been busy graduating from college and trying to decide what to do with my life. No biggie!

My mother was away on holidays so I figured I might as well make something with wheat. Why not, sure. It’s beginning to become a bit of a novelty actually making stuff without gluten-free flour. I might as well have thrown in extra gluten in for the craic. Don’t worry, I didn’t – that would be weird.

Seen as there were only two of us in the house at the time (and my brother isn’t much of a dessert person), it’s safe to say I ate a hell of a lot of cheesecake that week. I did have some help from a few friends… but mostly I helped myself.

I’m a dessert fiend – don’t judge me.

It’s not like I had cheesecake for breakfast every day that week…

1.67    1.51

Ingredients:
150g Digestive biscuits (smashed)
70g butter, melted
400g cream cheese
240g Toblerone, melted
270ml cream, whipped
Toblerone shavings for top

This recipe is very quick and easy, almost dangerously so. I found the original recipe here and adapted the ingredients to suit my tin size. It’s one of those easy cheesecakes that you just throw in the fridge.

Baked cheesecake is still on my to-do list.

Directions:
Throw the biscuits in a zip-lock bag and give them a good whack. Smash ’em up good.

Melt some butter. Pour that in the bag and mix around until all the crumbs are coated.

Press into the base of a spring-form tin (Think my tin is 26cm). Leave this in the fridge to set a bit.

Beat the cream cheese. Whip the cream and fold that in.

Melt the Toblerone. Mix that in too.

Pour this over the crumb base. Be all artistic and shave some Toblerone bits on the top.

Leave the cheesecake in the fridge for at least 2-3 hours.

Easy peasy.

1.65

Chili Con Carne

I started writing this draft almost three weeks ago, so I suppose my excuse for that would be procrastination. Really I’ve just been in work a lot and have had very few days off. What a lame excuse – sorry. And the poor quality photos are a result of my eagerness to eat the chili straight away.

This chili really is delicious. I can imagine it would be put to an even better use for chili fries, on burgers, hot dogs etc. It’s still great with tortilla chips. Or just a spoon.

1.34

Ingredients:
500g minced beef
1 onion
2 cloves garlic
450ml beef stock
400g tin chopped tomatoes
142g tin tomato puree
2 squares dark chocolate (70%)
1 tsp worcestershire sauce
250g tin kidney beans, drained
2 tsp sugar
1 tsp cayenne pepper
2 tsp paprika
2 tsp cumin
2 tsp chili powder
1 tsp nutmeg
dash cinnamon

Directions:
Cook the mince in a large pan with some olive oil. Add in the onions and garlic and cook until soft.

Basically just add everything else to the pot: beef stock, chopped tomatoes, tomato puree, chocolate, worcestershire sauce, kidney beans, sugar and spices. Mix.

Bear in mind you can adjust the spices to your liking. This amount gives it a fair kick. The first chili experiment involved was too much cumin – if that happens, add more nutmeg (it works wonders). It also involved some apple flavoured sour sugar… Improvisation! Or laziness. Why take the normal sugar out when there was a perfectly good, empty packet of fizzy apple cables on the counter? So really throw whatever you want in and it should still taste amazing.

I’m also now convinced that the sugar may have been the secret ingredient… In reality it probably didn’t make much of a difference to the taste, but one can hope.

Cover the chili and let it simmer for around 10-15 minutes. Or however long, once it has thickened and is heated through.

Serve with sour cream and grated cheese. Eat with tortilla chips, rice or anything you wish.

Enjoy!

1.35

Lemon & Strawberry Poppy Seed Pancakes

After seeing this on Pinterest, I knew I NEEDED to make these. Every time I looked at the picture, the urge to whip up some pancakes became stronger. I couldn’t resist any longer.

1.29

I love lemon. I love strawberries. I love pancakes. What could go wrong? Except for maybe a potential gluten-free flour disaster – it has a mind of its own.

The original recipe is from Creme de la Crumb.

For the Syrup:
200g(ish) strawberries
150g sugar
100ml water
1 tbsp honey
½ tsp vanilla

For the Pancakes:
210g self-raising flour (I used GF)
10-15g poppy seeds
¼ tsp baking soda
¼ tsp salt
Juice of 2 lemons
Zest of 1 lemon
50g sugar
240ml buttermilk
½ tsp vanilla
1 egg
150g strawberries

1.23    1.25  
Directions: 
To make the syrup, add the strawberries, sugar, water, honey and vanilla to a pan. Heat until the sugar dissolves and then blend the mixture until smooth. Place syrup back on the heat to thicken while making the pancakes.

Combine the flour, poppy seeds, baking soda and salt.

Whisk together the lemon juice, zest and sugar. Add in the buttermilk, vanilla and egg – whisk until smooth.

Make a well in the dry ingredients and pour in the wet mixture. Whisk together. Dice the strawberries and fold into the mixture.

Heat a pan, grease with butter and begin!

My first few pancakes were a disaster until the pan heated up – and no, there aren’t any photos of them. They should take about a minute on each side.

Serve with the strawberry syrup and strawberries.

1.31

P.S. You will have a ridiculous amount of syrup left over. Unless of course you drown your pancakes. Even still, I don’t know if it’s possible unless you actually drink it.

You now have my permission to stuff your face.

Coconut Pecan Brownies

Three words: Coconut. Pecan. Brownies. What better way to kick start my blog than with this recipe!

1.11I may have a slight obsession with coconut, pecans AND of course brownies, so when I stumbled upon these beauties about 4 years ago from The Craving Chronicles I was itching to test them out. And yes, I found this recipe through procrastination (Stumble Upon). Who ever said procrastination was a waste of time? I could literally spend hours salivating over the photos from Theresa’s blog. Make sure to check out the foodgawker gallery, although you may need something to wipe the drool from your mouth after you do. I can’t begin to describe just how amazing these golden, crunchy yet gooey brownies are. Don’t hesitate! You need to get up and make these right now. I mean it. Reeaaaddddyyyyy? Go! You won’t regret it.

1.05     1.131.09     1.08

After I first made these, I was hooked. Addicted – as was everyone else who ate them. These chocolaty delights are now my go-to dessert, and are often requested (or demanded) to be present for special occasions.

Makes 24-32 *(may vary depending on greediness)

For the Brownie Base:
170g salted butter
240g caster sugar
55g cocoa powder
85g self-raising flour
2 large eggs

For the Coconut Crust:
397g tin condensed milk
1 large egg
2 tsp vanilla extract
100g desiccated coconut
100g pecans
150g chocolate

As wonderful as the original recipe was, I made a few adjustments and changed the measurements from cups because that’s just how I roll. Roll? Mix? Whisk? You get the idea.

The original recipe says to use unsalted butter and salt, so I usually cut out the middle man and use salted butter. Laziness at its finest!

I generally use Odlum’s Tritamyl flour so my wheat intolerant mother can enjoy them too. It’s a gluten free flour and substitutes for wheat flour very well in most recipes – unless you’re making bread, maybe. Or waffles. Or most things with yeast.

And as for the coconut M&M’s that Theresa uses, yeah, well that’s just not happening in Ireland… If the glorious day comes when I can find them, maybe I’ll give it a go. For now it’s good ‘ole Dairy Milk (a staple food group in the average Irish diet).

I am a firm believer in using chopped chocolate over chocolate chips – bigger chunks, more substantial etc. This is not a debatable discussion in my opinion: Chunks > Chips.

1.14 Directions:
Preheat the oven to 190°C. Line a 9×13 inch tin, or any other similar rectangular tin, with foil or parchment and grease.

I’m lazy, so this is all getting done in one bowl. Melt the butter and whisk in sugar.

Then whisk in eggs to make a thick batter. Sieve the flour and cocoa powder into the mixture and whisk to incorporate.

Pour the batter into the baking tin and put in the oven for about 10-15 minutes.

Leave brownie layer to cool slightly while preparing the coconut crust layer and lower the oven to 175°C.

Still using the same bowl as the previous step, whisk the condensed milk and egg. Add in the vanilla.

Chop the chocolate into chunks. Cut or break pecans. (Note that breaking pecans by hand is extremely satisfying.) Add this and the desiccated coconut to the mixture and stir together.

Spread this mixture over the brownie layer, covering the entire surface of the brownies.

Back in the oven they go for around 20 minutes to get the top crust a nice golden colour.

If you have any self-restraint at all, leave the brownies to cool before cutting into bars.

Enjoy!